Permissions beyond the scope of this license may be available at http://www.cricutinspiration.blogspot.com.
Creative Commons License

Saturday, November 21, 2009

Puffy Box~so cute for gifts!!!

I was surfing the web last night and came across the site SplitcoastStampers. This site is new to me and I really enjoyed looking through all their projects. One in particular caught my eye~you guess it...the Puffy Box project. The designer (Brandy) on SCS used a CD to make her project. I was looking at it and thought how nice it would be to have the Cricut cut this out for me instead.

So, this project is NOT my original idea~but it will make your life easier if you want to cut quite a few of these out!

Here is the link to the original post on their site where I first saw this: http://www.splitcoaststampers.com/resources/tutorials/puffybox/


This project was designed on a 12x24 mat~but you can always cut it on a 12x12 as long as you move the image onto the left side of the 12x24 mat.

Overall dimensions: 1.5"Hx3.5"Wx3.5"L(approx.). I think you would be able to get one of those Ring boxes inside this pretty box! It's pretty deep :)


I used Accent Essentials-but you could any circle from any cart for this one. I also used Gypsy font in there too :)


To help me score the box I used a CD to keep my lines nice and smooth, there were some I had to free hand but this was definitely not hard :) (and you all know how score mark challenged I am LOL!)


Here is the box all scored and folded.


Now just find a pretty ribbon to tie around and you're done! This box just opens up completely once the ribbon is off~I didn't glue and flaps down (I don't think it's supposed to be glued actually).


If you would like to download this file you can do that HERE, please leave a THANK YOU before you go! :)

Cupcake Wrapper anyone??

Hi Everyone!! I had heard some rumblings on the message board for cupcake wrappers. For those of you who don't have design Studio and would just prefer to have a Gypsy file~this file is for you!

INSTRUCTIONS ARE FIRST~PICS OF WRAPPER AT END OF POST :)

oh okay, just one pic so you know what the heck I'm talking about :)


Once again I wanted to make a file that EVERYONE would be able to use no matter what cartridges you have loaded on your Gypsy. That's right~I did it again....this file uses only Gypsy Font and Wanderings :)

Okay~onto the details of this project:

This project was designed originally on a 12x24 mat~but you don't need to use one at all!

I selected this size while I was designing, as I liked having more room to move around on the mat. To be honest when I cut it I just used a 12x12 mat and didn't bother changing the mat size on the Gypsy (trust me the Expression didn't know the difference LOL!).

Also THERE ARE 2 PAGES for this file. You may also end up making a 3rd page~depending on where you want the 2 pieces placed on your mat. I used 2 pages for a very good reason~I promise!

On the FIRST page you have the outer wrapper and the base of the wrapper. If you touch one of those items you will see it's not linked to the other.

I did this specifically to allow you to BE ABLE TO MOVE THEM AROUND YOUR MAT. When you go to PAGE 2 you will understand why I did this. Here is a pic of page 1 for you. *Note: what is in red is what is on page 1. To get to page 2 just touch on the #1 on your top right hand corner. Click on any picture in this post to make it larger (easier on the eyes).


PAGE 2 shows quite a bit here~don't get worried it all makes sense in the end!

First thing right off the bat is now BOTH THE WRAPPER AND BASE are GROUPED together. This will allow you to enlarge or decrease your wrapper TOGETHER. Why did I do this? The answer is (and I found this out the hard way) if you decide after enlarging you want to move it around on the mat~but wait, they are grouped together and you just wanted the one piece. So you decide to push ungroup. Uh oh..... EVERYTHING is ungrouped....all those little pieces....a nightmare to weld!! So this is why I grouped them~easy enlarging or shrinking.

One more thing~How do I know what size I have and what should I use?

Measure the bottom of a muffin cup, the diameter across the circle should tell you what the height for your circle needs to be. In this one it is 2.16"H. After you've enlarged your wrapper and you want to see just how large it will be: Just touch 1x on your base wrapper (this will highlight to blue), then TAP ONE MORE TIME on the middle circle (turning it PURPLE) and voila! You will see the dimensions of your base diameter. I've highlighted these important details in the aqua circles.


So, if you're like me and you want to move stuff around to save paper.....

DO ALL YOUR ARRANGING ON PAGE 1. Once you have it arranged the way you want it, GROUP BOTH items. Keeping these 2 pieces highlighted in BLUE touch the + (plus) button on the top left of your screen. This will bring you to PAGE 3. Now just touch the COPY button located under the ADVANCED tab (top right hand of your screen). It is the 2 little purple squares that are beside the eye button. After you touch the copy button your image from PAGE 1 is copied to page 3 (all nicely arranged the way you want it to save paper!).

On page 3 feel free to enlarge or decrease the wrapper to your project's requirements.

When you are ready to cut just make sure you are on page 3 and you are all set!! Now, if during all of this you make a mistake~just exit out and DON'T save. Open it up and just try again :)

Any questions AT ALL please leave me a note~I read each and every single comment. Just be sure to leave me a way to contact you :)

I hope you all enjoy this one~I had a great time designing it!!


*This knocks another cartridge off my list that I was going to buy just for 1 cut LOL!*


Click HERE for the file - but please leave a thank you before you leave :)
Creative Commons License
Video, Images and Artistic Works by Myamagoo of Design~Create~Inspire is licensed under a Creative Commons Attribution-Noncommercial-No Derivative Works 3.0 Unported License.
Permissions beyond the scope of this license may be available at
http://www.cricutinspiration.blogspot.com.


Tuesday, November 17, 2009

AH HA!! Pillow Box Finished!! AND with Score Marks!!

Wow, this box was tough.

For this box you won't have to worry about having the cartridges I used to design this project. Why do you ask? HOW could that possibly be? Don't you have to own the carts used in order to cut?

Well, the answer to this is: I used ONLY Gypsy Font and Wanderings!!! That's right (I'm so excited about this!) all gypsy owners can download and use this file! Can you say WOO HOO?! One more time! Let me hear you say: WOO HOO!!

okay, on to the details: Overall dimensions of the box shown in picture~ 3.75"L(approx.)x2.75W"(approx.)x.75"H(height was measured with it laying flat on my desk).

NOTES:

Project designed on a 12x12 mat~woo hoo! don't have to go and buy a bigger mat :)

*Box and Score marks are grouped together* so when you enlarge EVERYTHING ENLARGES.

I did this for 2 reasons: the first being when I enlarged the pillow box I had one heck of a time lining up the score marks afterwards on their own.

Grouping it all together (after I welded the pillow box on it's own) allowed me to resize and keep the proportions correct.

The second reason I did this is for those of you who wish to have NO score marks. Just double tap on the pieces and delete. This will not affect the welding on the pillow box whatsoever. Don't forget you can always modify it to suit your taste.

So without further ado~A pic of my TEST cut....free of bugs and with wonderful score marks to show you where the flaps are supposed to be scored (okay, I'll admit it~those score marks are really for me because I kept messing up my scoring with the flaps LOL!!)

First pic I circled the score marks so you could all see them :) I did my best to make them as skinny and small as I could, using just the gypsy carts made it tough...


I hope you enjoy this file, please leave a simple Thank you if you download this file - this took a long time to make :)

I've added a file with a heart cutout for Valentines Day! Enjoy it HERE.

Saturday, November 7, 2009

GABLE BOX Gypsy file IS READY!!!!

oh my, thank you so much for being so patient!!! I know some of you have been waiting for this all day.

I thought today: wouldn't it be nice if I put score marks on the box (like they do in TTBM) and add a few things....

Well I went and messed up all the welding I had painstakingly finished on the box! Talk about frustration.

So, thanks to that glitch I am offering you a WONDERFUL GABLE BOX sans score marks. Better than nothing right? LOL!!!!

LADIES AND GENTS~ this is a 2 page file I am including instructions throughout this post on how to cut a project using more than 1 page. So please read carefully and observe the pictures and you should have no problem cutting and assembling this BEAUTIFUL GABLE BOX!!! who else is doing the happy dance with me? Can't you just picture this black little beauty all dressed up in Christmas' Finest? Oh yes, she will be beautiful....I'm going to glam and bling her out tomorrow. An after picture will be coming soon! LOL! ok, as promised instructions and pics:

After downloading your Gable Box gypsy file:
open up your file. You will see that I have included the list of cartridges that were used in the design. If you do not want these to cut out as well please delete these before you select the cut button.


Once your box has been cut, your gypsy will ask you what you want to do. DO NOT UNLOAD THE MAT!!!! Instead select Return to Design.


Once you are back on page one, look in the top right hand corner of your screen and touch your stylus to the number 1. It will change to the number 2. You are now on page 2 of the design. This page is for the handle cutouts and holes to keep the box closed.
(these holes had to be on this page as they were welded and my gypsy went wonky with the welding when I had it on page 1 originally).


Now all you have to do is select CUT, your mat is STILL loaded into the cricut at this point and the gypsy will only cut what is on page 2.


Now as I said previously, my score marks were a bust~I am going to try them again tomorrow and see where I get. For now I have shown a picture demonstrating where the scormarks should be. You will make 2 long horizontal marks using a long ruler. Then you will make 4 smaller score marks vertically. Use the photo as a guide.


Now that everything has been scored and folded/creased your box is ready for assembly. Start with it laying flat and lift up the right side of the box. Slide the right side of the box towards the bottom and have that side slip in behind the tab~as shown in photo.


Next fold the top piece down and tuck behind that tab as shown in the photo.


Lastly take your left side and slide it into the middle, use the photo as your guide :)


Don't forget to add ahesive to your box after you've tried DRY FITTING IT a couple times....practice putting the bottom together before you get the glue out ok??


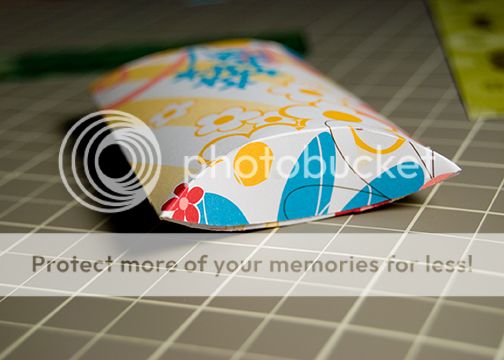
And finally~the long awaited GABLE BOX!!!
Overall Dimensions: 5.25"Lx7"H(including the handles in this measurement)x5.25"D.

Don't forget I haven't dressed this box yet, but already you can see it has good bones and will turn into something wonderful!
Thanks for stopping by!!


Cick HERE for the Gypsy file - Please leave a quick note to say THANKS before you leave - this file took me 3 days to make :)

Wednesday, November 4, 2009

Gypsy Files for Sharing!!

I've decided to leave my files for sharing at the top of my blog. I will add to them as I design. Please leave me a comment if you decide to pick up a file or two....I love comments and they encourage me to keep designing and sharing!

This is so exciting! Thanks for stopping by :)

Fancy Custom Gift Box using Gypsy

Well folks, this is it~my first gift box made entirely from scratch! I wasn't sure how it would turn out. Sometimes my projects fail miserably in the execution stage. Fortunately this one was a success!
I started with my design on my gypsy:


Then onto the cutting stage, SEI paper CUTS LIKE A DREAM ON THE CRICUT!! LOVE, LOVE LOVE THAT PAPER!


Add a little glue, a little bling, a handmade flower on top and here you go: A gift box you would be proud to give to anyone :)


I've included the step by step in the post below after having several gypsy users ask for the details. Enjoy!

Creative Commons License
Video, Images and Artistic Works by Myamagoo of Design~Create~Inspire is licensed under a Creative Commons Attribution-Noncommercial-No Derivative Works 3.0 Unported License.
Permissions beyond the scope of this license may be available at
http://www.cricutinspiration.blogspot.com.


Please click HERE for the gypsy file - but be sure to leave a note of THANKS before you leave- this file took me a long time to complete :)